2012년 9월 12일 수요일

리눅스 Run level 이란?

이번에는 리눅스의 런 레벨에 대해 알아 보겠습니다. 우선 Run level이 무엇인지부터 알아야겠죠?
런레벨(Run level)이란, 시스템 관리의 용이함을 위하여 서비스의 실행을 단계별로 구분하여 적용하는 것을 말합니다.

런레벨은 0부터 6번까지 있는데요. 한번 알아보겠습니다.

# 0 - halt (DO NOT set initdefault to this)
시스템 종료를 의미합니다. 즉, 런레벨 0으로 변경하라는 명령을 내리면 시스템을 종료하는 것이죠.
# 1 - Single user mode
시스템 복원모드라고도 하며, 기본적으로 관리자 권한 쉘을 얻게 됩니다.
주로, 파일시스템을 점검하거나 관리자 암호를 변경할 때 사용합니다.
# 2 - Multiuser mode, without NFS (The same as 3, if you do ot have networking)
NFS(Network File System)을 지원하지 않는 다중 사용자 모드입니다.
네트워크를 사용하지 않는 텍스트 유저모드라고 할 수 있죠.
# 3 - Full muliuser mode
일반적인 쉘 기반의 인터페이스를 가진 다중 사용자 모드입니다.
쉽게 말하면 그래픽 유저 모드가 아닌 '텍스트 유저 모드'입니다.
# 4 - unused
4번은 쓰이지 않습니다. 기본적으로는 사용되지 않지만, 임의로 정의해서 사용할 수 있는 레벨입니다.
# 5 - X11기본적으로는 level 3과 같습니다. 다른 점은 '그래픽 유저 모드' 라는것!!!
# 6 - reboot (DO NOT set initdefault to this)
시스템 재부팅을 의미합니다. 런레벨 6으로 변경하라는 명령을 내리면 시스템을 재부팅 하죠.


주로 사용하게 되는 것은 0, 3, 5, 6 을 많이 씁니다. 이 런레벨의 변경은 root 사용자의 경우만 가능합니다. 즉, 터미널 창에서 관리자 모드로 들어가 gedit /etc/inittab을 입력하면 런레벨을 바꿔줄 수 있습니다. 한번 해볼까요?


터미널 창을 켜고, 관리자 모드로 들어갑니다. gedit /etc/inittab 명령어를 입력해주세요.


그럼 아래와 같은 창이 켜지죠. 위에서 봤던 runlevel에 안내가 나옵니다.


그리고 그 간단한 안내 아래에서..! 런레벨을 바꿔줄 수 있습니다.
한번 텍스트 유저 모드로 바꿔볼까요? 블록한 부분을 봐주세요 :)


5를 3으로 바꿔주고 빨간색 네모로 강조한 '저장' 버튼 클릭하면 끝! 입니다 :)


그럼 이제 시스템을 다시 시작해볼까요? 아래 화면과 같이 텍스트 모드로 시작되는 것을 볼 수 있습니다. :)


다시 그래픽 유저 모드로 돌아가고 싶을 때는, init 명령어를 이용하시면 됩니다. 이렇게요. :)
inittab이나 init 명령어 처럼 런레벨을 변경하는 것은
오직 관리자 모드에서만 가능하므로 su - 부터 입력해주셔야합니다.


그럼 명령어 입력하기 무섭게 그래픽 유저 모드로 넘어가지요.


명령어 init단순히 런레벨을 변경해서 부팅하는 명령어이기 때문에
시스템 종료후, 이대로 다시 부팅하게 되면 텍스트 유저 모드로 부팅하게 됩니다.

다시 그래픽 유저 모드로 바꿔주려면,
 로그인하셔서 아까처럼 터미널 창에서 관리자 모드로 바꿔주고 gedit /etc/inittab 입력후
inittab창에서 id:3:initdefault → id:5:initdefault 로 바꿔주시면 됩니다. :)

2012년 9월 5일 수요일

DHCP General Operation and Client Finite State Machine

DHCP General Operation and Client Finite State Machine
Dynamic address allocation is probably the most important new capability introduced by DHCP. In the last section I discussed in detail the significance of the change from IP address ownership to IP address leasing. I also provided a high-level look of the activities involved in leasing, by providing an overview of the DHCP lease “life cycle”.
An overview of this sort is useful to get a general handle on how leases work, but to really understand the mechanics of DHCP address assignment and client/server communication, we need more detail on how the devices behave and what messages they send. One tool often employed by networking engineers to describe a protocol is a theoretical model called a finite state machine (FSM). In this technique, the protocol's specific behavior is illustrated by showing the different states a device can be in, what possible transitions exist from one state to another, what events cause transitions to occur, and what actions are performed in response to an event. The TCP operational overview contains more general background information on finite state machines.
The DHCP standard uses an FSM to describe the lease life cycle from the perspective of a DHCP client. The client begins in an initial INIT state where it has no lease, and then transitions through various states as it acquires, renews, rebinds and/or releases its IP address. The FSM also indicates what message exchanges occurs between the server and client at various stages.
Some people think finite state machines are a little “dense” and hard to understand, and I can see why. You can skip this topic of course, but I think the FSM provides a useful way of illustrating in a comprehensive way most of the behavior of a DHCP client. Table 188 describes each of the DHCP client states, and summarizes the messages sent and received by the client in each, as well as showing the state transitions that occur in response. The FSM’s states, events and transitions are easier to envision in Figure 262, which also incorporates a color coding scheme so you can see which states are associated with each of the main DHCP processes.

Table 188: DHCP Client Finite State Machine
State
State Description
Event and Transition
INIT
This is the initialization state, where a client begins the process of acquiring a lease. It also returns here when a lease ends, or when a lease negotiation fails.
Client Sends DHCPDISCOVER: The client creates a DHCPDISCOVER message and broadcasts it to try to find a DHCP server. It transitions to the SELECTING state.
SELECTING
The client is waiting to receive DHCPOFFER messages from one or more DHCP servers, so it can choose one.
Client Receives Offers, Selects Preferred Offer, Sends DHCPREQUEST: The client chooses one of the offers it has been sent, and broadcasts a DHCPREQUEST message to tell DHCP servers what its choice was. It transitions to the REQUESTING state.
REQUESTING
The client is waiting to hear back from the server to which it sent its request.
Client Receives DHCPACK, Successfully Checks That IP Address Is Free: The client receives a DHCPACK message from its chosen server, confirming that it can have the lease that was offered. It checks to ensure that address is not already used, and assuming it is not, records the parameters the server sent it, sets the lease timers T1 and T2, and transitions to the BOUND state.
Client Receives DHCPACK, But IP Address Is In Use: The client receives a DHCPACK message from its chosen server, confirming that it can have the lease that was offered. However, it checks and finds the address already in use. It sends a DHCPDECLINE message back to the server, and returns to the INIT state.
Client Receives DHCPNAK: The client receives a DHCPNAK message from its chosen server, which means the server has withdrawn its offer. The client returns to the INIT state.
INIT-REBOOT
When a client that already has a valid lease starts up after a power-down or reboot, it starts here instead of the INIT state.
Client Sends DHCPREQUEST: The client sends a DHCPREQUEST message to attempt to verify its lease and re-obtain its configuration parameters. It then transitions to the REBOOTING state to wait for a response.
REBOOTING
A client that has rebooted with an assigned address is waiting for a confirming reply from a server.
Client Receives DHCPACK, Successfully Checks That IP Address Is Free: The client receives a DHCPACK message from the server that has its lease information, confirming that the lease is still valid. To be safe, the client checks anyway to ensure that the address is not already in use by some other device. Assuming it is not, the client records the parameters the server sent it and transitions to the BOUND state.
Client Receives DHCPACK, But IP Address Is In Use: The client receives a DHCPACK message from the server that had its lease, confirming that the lease is still valid. However, the client checks and finds that while the client was offline, some other device has grabbed its leased IP address. The client sends a DHCPDECLINE message back to the server, and returns to the INIT state to obtain a new lease.
Client Receives DHCPNAK: The client receives a DHCPNAK message from a server. This tells it that its current lease is no longer valid; for example, the client may have moved to a new network where it can no longer use the address in its present lease. The client returns to the INIT state.
BOUND
Client has a valid lease and is in its normal operating state.
Renewal Timer (T1) Expires: The client transitions to the RENEWING state.
Client Terminates Lease, Sends DHCPRELEASE: The client decides to terminate the lease (due to user command, for example.) It sends a DHCPRELEASE message and returns to the INIT state.
RENEWING
Client is trying to renew its lease. It regularly sends DHCPREQUEST messages with the server that gave it its current lease specified, and waits for a reply.
Client Receives DHCPACK: The client receives a DHCPACK reply to its DHCPREQUEST. Its lease is renewed, it restarts the T1 and T2 timers, and returns to the BOUND state.
Client Receives DHCPNAK: The server has refused to renew the client's lease. The client goes to the INIT state to get a new lease.
Rebinding Timer (T2) Expires: While attempting to renew its lease, the T2 timer expires, indicating that the renewal period has ended. The client transitions to the REBINDING state.
REBINDING
The client has failed to renew its lease with the server that originally granted it, and now seeks a lease extension with any server that can hear it. It periodically sends DHCPREQUEST messages with no server specified until it gets a reply or the lease ends.
Client Receives DHCPACK: Some server on the network has renewed the client's lease. The client binds to the new server granting the lease, restarts the T1 and T2 timers, and returns to the BOUND state.
Client Receives DHCPNAK: A server on the network is specifically telling the client it needs to restart the leasing process. This may be the case if a new server is willing to grant the client a lease, but only with terms different than the client’s current lease. The client goes to the INIT state.
Lease Expires: The client receives no reply prior to the expiration of the lease. It goes back to the INIT state.


Figure 262: DHCP Client Finite State Machine
This diagram shows the finite state machine used by DHCP clients. The colored background areas show the transitions taken by a DHCP client as it moves through the four primary DHCP processes: allocation, reallocation, renewal and rebinding.


This is just a summary of the finite state machine, and does not show every possible event and transition, since it is complex enough already. For example, if a client that received two offers in the SELECTING state receives a DHCPNAK from its chosen server in the REQUESTING state, it may choose to send a new DHCPREQUEST to its “second choice” instead of starting over from scratch. Also, the client must have logic that lets it “time out” if it receives no reply to sent messages in various states, such as not receiving any offers in the SELECTING state. The next few topics discuss these matters in more detail.
Note also that the DHCP standard does not describe the DHCP server's behavior in the form of a finite state machine, only the client's. Here too, there is more information on what exactly DHCP servers do in the pages that follow.
I should also point out explicitly that this finite state machine applies to dynamically-allocated clients; that is, ones with conventional leases. A device configured using “automatic” allocation will go through the same basic allocation process, but does not need to renew its lease. The process for manual allocation is somewhat different.

Reference from http://www.tcpipguide.com/free/t_DHCPGeneralOperationandClientFiniteStateMachine.htm

2012년 8월 20일 월요일

아웃룩 2007 에서 중복메일 수신하는 문제 해결.

  1. ScanPST를 이용하여, 개인 폴더 파일 복구
    a. 윈도우 시작 버튼을 클릭합니다.
    b. 실행 창에 [scanpst.exe]를 검색합니다.
    (일반적으로 ScanPST는 C:\Program Files\Microsoft Office\Office12\scanpst.exe 에 있습니다.)


    c. ScanPST를 이용하여, 손상된 개인 폴더 파일을 복구합니다.
  2. 프로필 재 등록
    a. 윈도우 시작 버튼을 클릭합니다.
    b. 실행 창에 [outlook /resetnavpane]를 입력합니다.
  3. Outlook 프로필 재설정 하는 방법
    a. 윈도우 시작 버튼을 클릭합니다.
    b. 윈도우 시작 메뉴 중 [제어판]을 선택합니다.


    c. 모든 제어판 항목 중에서 [메일]을 선택합니다.


    d. 메일 메뉴가 나타나면, [프로필 보기]를 선택합니다.


    e. 프로필 설정 메뉴가 나타나면, [사용할 프로필 선택]을 선택한 후 [추가] 버튼을 클릭합니다.
    f. 새롭게 생성할 프로필 이름을 입력하고, [확인] 버튼을 클릭하면, 계정을 다시 설정할 수 있습니다.
    (계정, 데이터 파일(*.pst)를 다시 설정하여, 문제가 반복되는지 확인해 보시기 바랍니다.)


Windows Vista 및 7 해결방법.


  1. ScanPST를 이용하여 개인 폴더 파일 복구
    a. 윈도우 시작 버튼을 클릭합니다.
    b. 검색 및 실행 창에 [scanpst.exe]를 입력합니다.


    c. ScanPST가 검색되면, 실행하여 문제가 발생하는 개인 폴더 파일(*.pst)을 복구합니다.
    (복구 작업은 개인 폴더 파일의 용량에 따라 시간이 다소 오래 걸릴 수도 있습니다.)
  2. 타사 프로그램과 충돌 - 문서 보안 프로그램(Fasoo.com, McAfee, Document-Safe, SoftCamp...)등이 설치되어 있다면 제거합니다.
    (백신 프로그램이 설치되어 있는 경우 POP3 감시, 또는 Outlook 감시 기능을 해제합니다.)
    a. 윈도우 시작 버튼을 클릭합니다.
    b. 검색 및 실행 창에 [msconfig]를 입력합니다.


    c. 시스템 구성 메뉴가 나타나면, 서비스 탭의 [모든 Microsoft 서비스 숨기기]를 체크한 후 [모두 사용 안 함]을 선택합니다.


    d. 시작 프로그램 탭의 [모두 사용 안 함]을 선택합니다.


    e. 시스템 설정이 완료되면, 시스템을 Reboot합니다.
    (해당 방법으로 문제가 해결될 경우, a~e를 반복하여 사용자가 사용하는 서비스, 프로그램을 몇개씩 추가하여 문제가 발생하는 프로그램을 확인하여 제거합니다.)
  3. 프로필 설정
    a. 윈도우 시작 버튼을 클릭합니다.
    b. 윈도우 시작 메뉴 중 [제어판]을 선택합니다.


    c. 모든 제어판 항목 중에서 [메일]을 선택합니다.


    d. 메일 메뉴가 나타나면, [프로필 보기]를 선택합니다.


    e. 프로필 메뉴가 나타나면, [사용할 프로필 선택]을 체크한 후 [추가]를 선택합니다.
    f. 새로 사용할 프로필 이름을 입력합니다.


    g. 프로필 설정이 완료되면, 사용자 계정을 설정합니다. - 새로운 계정을 설정하기를 권장합니다.
    (해당 방법으로 문제가 해결될 경우, 기존 프로필에서, 규칙, 데이터 파일 설정, 메일 설정 등을 확인한 후 새로운 프로필에도 적용하고, 기존 프로필은 제거합니다.)
[참고 자료]
http://support.microsoft.com/kb/811151/ko

2012년 5월 7일 월요일

리눅스 시스템 점검

3.10 시스템 정보보기

1) cpu정보보기  
# more  /proc/cpuinfo 


2) 메모리 정보보기 
#  free  –mt 
usage: free [-b|-k|-m|-g] [-l] [-o] [-t] [-s delay] [-c count] [-V]
        -b,-k,-m,-g show output in bytes, KB, MB, or GB          -h show detailed low and high memory statistics
          -o use old format (no -/+buffers/cache line)
        -t display total for RAM + swap

# more /proc/meminfo


3) 하드용량보기      
# df –h 
Filesystem            Size  Used Avail Use% Mounted on
/dev/hda2              28G  4.6G   22G  18% /
/dev/hda1              99M  9.2M   85M  10% /boot
none                  251M     0  251M   0% /dev/shm
root]#

4) 인터페이스 ip정보 보기
# ifconfig eth0
# ifconfig  –a

# vi /etc/sysconfig/i18n   (언어 로케일설정)
LANG="ko_KR.eucKR"
SUPPORTED="ko_KR.eucKR:ko_KR:ko"
SYSFONT="lat0-sun16"
SYSFONTACM="iso15"

en_US

# Vi .bashrc
# export LANG=ko_KR.eucKR (자신의 쉘에 언어코드 변경) 
또는 
#  export LANG=en_US
# LANG=en


3.10.1. CPU 문제 점검명령어들  Top, ps, uptime, vmstat, pstree 등

1) CPU 활용량, 프로세스상태, 메모리확용량

# top  
CPU0 states:  0.0% user,  0.2% system,  0.0% nice, 99.3% idle
CPU1 states:  0.0% user,  0.0% system,  0.0% nice, 100.0% idle
Mem:  1033308K av, 1007748K used,   25560K free,       0K shrd,   98256K buff
// 메모리 1Giga , 1Giga가까이 사용중, 남음메모리는 25 Mega


3.10.2. 메모리 문제 점검 명령어들   free, vmstat

1)  # free    -mt
                 total       used       free     shared    buffers     cached
Mem:           501        485         16          0        120        148
-/+ buffers/cache:        216        285
Swap:         1019         13       1006
Total:        1521        498       1022

// 512Mega 메모리에  485M 사용중이고,  16M 여유가 있다.


2) # vmstat 1
   procs                      memory      swap          io     system      cpu
 r  b  w   swpd   free   buff  cache   si   so    bi    bo   in    cs us sy id
 1  0  0  13332  16488 123720 152352    0    0     0     5    4     2  0  0     2
 0  0  0  13332  16488 123720 152352    0    0     0     0  106    28  0  0  100
 0  0  0  13332  16488 123720 152352    0    0     0    28  107    39  0  0  100

// 164M 여류가 있다. ,

# vmstat 3 20    (3초마다 20번상태 보기)
procs                      memory      swap          io     system         cpu
r  b   swpd   free   buff  cache   si   so    bi    bo   in    cs us sy id wa
0  0      0 1746628  82216  83888    0    0     0     1   53     4  0  0 100  0
//1.7 Giga메모리가 남아 있음.

// 프로세스 관련 항목: r  : CPU 접근 대기 중인 실행 가능 프로세스 수,  b : 인터럽트 불가능한 수면 상태인 프로세스 수
// 메모리 관련 항목 : swpd — 사용된 가상 메모리 용량,  free — 여유 메모리 용량, buff — 버퍼에 사용된 메모리 용량, cache — 페이지 캐시에 사용된 메모리 용량
// 스왑 관련 항목 : si — 디스크에서 스왑된 메모리 용량, so — 디스크로 스왑되어 나간 메모리 용량
// 입출력 관련 항목 : bi — 블록 장치로 보내진 블록, bo — 블록 장치에서 받아온 블록
// 시스템 관련 항목 : in — 일초당 인터럽트 수, cs — 일초당 문맥 전환 작업수
// CPU 관련 항목 : us — CPU가 사용자 수준 코드를 실행한 시간 (백분율 단위), sy — CPU가 시스템 수준 코드를 실행한 시간 (백분율 단위),id — CPU가 아무런 작업을 수행하지 않은 시간 (백분율), wa — 입출력 대기


어플리케이션이 메모리 많이 사용할시 점검툴
http://supervisord.org/
http://www.linux.com/feature/146166


3.10.3 메모리에 문제가 없다면 디스크 I/O 점검 : 
#df -h, du, 쿼타 등

3.10.4 디스크와 메모리에 문제가 없는데도 시스템에 문제가 생기면, CPU의 오버헤드에 문제가 있을 가능성이 크다

3.10.5  기타 디렉토리 관련 명령어
1) 현재 디렉토리 총용량보기  
#  du -c -h --max-depth=0
4.6G    합계

2) 현재 디렉토리크기         
# du -h --max-depth=1 .

3) 가장 큰 파일 찾기  
#  ls -lR | sort +4n

5) 어떤 프로세서가 가장 많은 메모리를 잡아먹구 있나?  
# ps -aux | sort +4n

6) 원하지 않는 사용자 터미널 접속끊기 ( session )
# w 
# skill -Kill -v pts/11   ( # skill -kill user111 )

7) 날짜 싱크
# date 
# rdate -s time.bora.net
# clock -w

8) 열린포트보기
#  netstat -anp | grep LISTEN

9) 접속자에게 메시지 보내기  
#  wall 지금 서버점검합니다. 로그아웃해주세요. 문제있으면 전화주세요 02-111.1111      Ctrl-D 

10) icmp echo 막기
#   echo 1 > /proc/sys/net/ipv4/icmp_echo_ignore_all

11) 하루동안 만들어진 파일중 hack 들어가는거 찾기 :
# find / -ctime -1 | grep hack


3.10.6  로그온 사용자 점검

과거에 로그온 한 사용자 기록보기 
# Last 

사용자별 마지막 로그온 시간 보기 
# lastlog

콘솔이 아닌곳에서 루트로 로그인한 것 찾기 
# last root |grep -v console  

프로세서 보기  
# Ps –au | more

현재 로그인한 사람 정보 보기  
# Who 

2012년 5월 6일 일요일

DHCP Servers with Multiple NICs

DHCP servers with multiple interfaces pose two configuration challenges. The first is setting up the correct routing and the second is making sure only the required interfaces are listening to serve DHCP. Don’t worry, both will be discussed next.

Routing

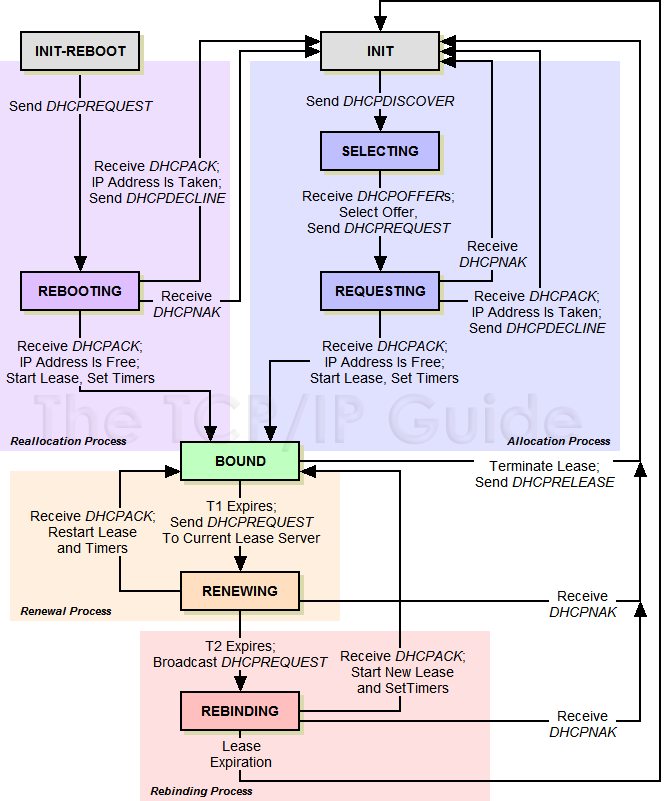
When a DHCP configured PC boots, it requests its IP address from the DHCP server. It does this by sending a standardized DHCP broadcast request packet to the DHCP server with a source IP address of 255.255.255.255.
If your DHCP server has more than one interface, you have to add a route for this 255.255.255.255 address so that it knows the interface on which to send the reply; if not, it sends it to the default gateway. (In both of the next two examples, we assume that DHCP requests will be coming in on interface eth0).
Note: More information on adding Linux routes and routing may be found in Chapter 3, "Linux Networking".
Note: You can't run your DHCP sever on multiple interfaces because you can only have one route to network 255.255.255.255. If you try to do it, you'll discover that DHCP serving working on only one interface.

Temporary Solution

You can temporarily add a route to 255.255.255.255 using the route add command as seen below.
[root@bigboy tmp]# route add -host 255.255.255.255 dev eth0
If you want this routing state to be maintained after a reboot, then use the permanent solution that's discussed next.

Permanent Solution

Create a permanent route to 255.255.255.255. This will vary according to your version of Linux
Fedora / RedHat / CentOS: Add the route to your /etc/sysconfig/network-scripts/route-eth0 file if the route needs to be added to your eth0 interface.
#
# File /etc/sysconfig/network-scripts/route-eth0
#

255.255.255.255/32 dev eth0
Ubuntu / Debian: Add the route to your /etc/network/interfaces file. In this case the route is added to the eth0 interface.
#
# File: /etc/network/interfaces
#

iface eth0 inet static

       up route add -host 255.255.255.255 eth0
Simple Linux routing is covered in Chapter 3, "Linux Networking" and will add more clarity to adding permanent static routes.

Listening

Once you have defined the interface for your DHCP routing you should also ensure that your DHCP server only listens on that interface and no others. This methodology to do this varies depending on your versión of Linux.
Fedora / RedHat / CentOS: The /etc/sysconfig/dhcpd file must be edited and the DHCPDARGS variable edited to include the preferred interface. In this example interface eth0 is preferred.
# File: /etc/sysconfig/dhcpd
DHCPDARGS=eth1
Debian / Ubuntu: The /etc/default/dhcp3-server file must be edited and the INTERFACES variable edited to include the preferred interface. In this example interface eth0 is preferred.
# File: /etc/default/dhcp3-server
INTERFACES="eth0"
You will be able to verify success in one of two ways. First the netstat command using the –au options will give the list of interfaces listening on the bootp (DHCP) UDP port.
[root@bigboy-f ~]# netstat -au  | grep bootp
udp        0     0 192.168.1.100:bootps    *:*
[root@bigboy-f ~]#
Secondly, your /var/log/messages file will also reveal the defined interfaces used when the DHCPd daemon was restarted.
Jan  8 17:22:44 bigboy dhcpd: Listening on LPF/eth0/00:e0:18:5c:d8:41/192.168.1.0/24
Jan  8 17:22:44 bigboy dhcpd: Sending on   LPF/eth0/00:e0:18:5c:d8:41/192.168.1.0/24
Success! You can go back to lunch!
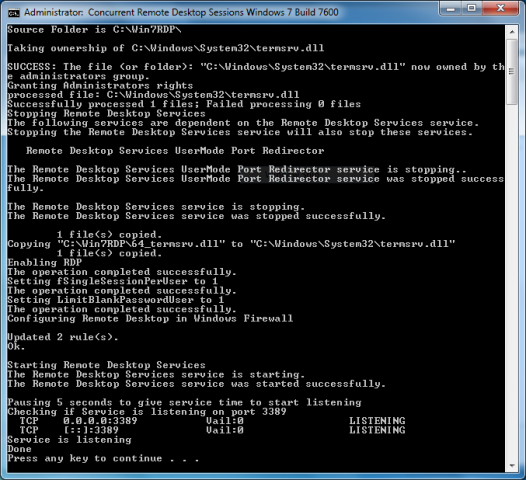
2012년 4월 17일 화요일

Active Directory

디렉터리란?
사용자 ,컴퓨터 파일 등과 같은 개체에 대한 정보를 말한다.

디렉터리서비스
-사용자가 검색하고자 하는 개체의 특성중 일부를 제공하면 네트워크에서 해당 개체를 찾을수 있도록 해주는 서비스를 말하며
Active Directory는 Windows기반의 디렉터리 서비스

Active Directory는 다음에 설명하는 도메인 및 포리스트로 구성된 Windows기반의 네트워크에 산재한 개체에 대한 정보를 저장하며
사용자가 이정보를 손쉽게 검색 할수 있도록 한다. 사용자는 한번 로그인하면 네트워크에서 사용자에게 허용된 모든 자원에 접근
할수 있으며 네트워크 관리자는 네트워크의 모든 개체를 한곳에서 관리할수있다

도메인 컨트롤러는 해당 도메인의 Active Directory를 실행하는 컴퓨터를 말한다.
각 도메인 컨트롤러가 도메인 내의 네트워크 자원에 대한 정보를 저장하는 Active Directory의 데이터베이스를 데이터저장소라고한다

데이터베이스의 내용은 스키마에 의해 정의된다. 스키마는 클래스와 클래스에 포함되는 특성들에 대한 정의를 가지는데,Active Directory의 디렉터리에 저장되는 개체들은 스키마에 정의되어 있는 클래스의 인스턴스다.

Active Directory구조
Active Directory 서비스는 데이터 모델,스키마,보안모델,관리모델의 주요 요소로 구성된다.

데이터모델 : Active Directory의 데이터모델은 X.500의 데이터모델을 기반으로 만들어졌다. 디렉터리에는 네트워크의 여러개체에 대한 정보가 저장되며 각 개체는 스키마에서 정의한다.

스키마 : Active Directory의 디렉터리에 저장되는 개체의 클래스에 대한 정의로 구성된다.

보안모델 : Active Directory의 디렉터리에 대한 접근은 ACL에 의해 제어된다

관리모델 : 인증된 사용자에 대하여 Active Directory의 관리를 수행할 수 있도록 한다.
상위관리자가 하위 관리자에게 관리를 위임할 수 있다.

Active Directory 서비스에 대한 접근
Active Directory는 기본적으로 LDAP(Lightweight Directory Access Protocol)를 사용하여 클라이언트 및 도메인 컨트롤러 사이의 통신을
수행한다. LDAP는 TCP/IP네트워크에서 사용할 수 있도록 IETF그룹에서 제정한 표준 통신 프로토콜로,복잡성을 배제하고 디렉터리 서비스에 효율적으로 접근할 수 있도록 개발된 개방형 인터넷표준이다.

Active Directory 서비스 구조
DSA(디렉터리 시스템 에이전트) : 디렉터리에 저장된 부모자식 관계에 의한 계층구조를 정의한다
데이타베이스계층 : 응용프로그램과 데이터베이스 사이의 추상화를 지원한다.
ESE(확장 가능한 저장소 엔진) : 데이터 저장소의 각 레코드에 직접 접근한다.
데이터 저장소 : ESE가 관리하는 디렉터리의 데이터를 저장한 파일로서 이름은 Ntds.dit

데이터저장소 구성요소
도메인데이터 : 도메인 데이터는 도메인에 있는 개체에 대한 정보가 저장된다
구성데이터 : 디렉터리의 토폴리지에 관한 정보를 저장한다.
스키마데이터:스키마 데이터에는 도메인에 속한 모든 개체에 대한 정의가 저장된다.
응용프로그램데이터 : 관리자 혹은 응용 프로그램이 만들고 관리한다.

디렉터리 파티션의 할당량
사용자가 고의로 계속 개체를 만들어서 도메인 컨트롤러의 데이터 저장소 공간이 부족해지는것을 방지할 수 있다.

구성원 서버
구성원서버는 기타서비스를 제공하는 컴퓨터를 의미한다(웹서버,인증서버,방화벽 및 원격 액세스 서버)

이름체계
연속적인이름공간 : 자식 개체의 이름에 부모 도메인의 이름이 포함된다. 도메인 트리는 연속적인 이름 공간이다.
불연속적인이름공간 : 부모개체와 자식 개체의 이름이 서로다르다. 포리스트는 불연속 적인 이름공간이다.

Active Directory와 DNS는 이름 공간을 공유 하지만 서로 다른 서비스다.Active Directory 클라이언트는 단지
도메인 컨트롤러를 찾기위해 DNS서비스를 이용하는 것이다. 따라서 Active Directory가 동작하기 위해서는 DNS가 작동하고있어야된다.

DN(공유이름)
  • CN = 일반이름
  • OU = 조직 구성 단위 이름
  • DC = 부분 도메인 이름
RDN(상대 고유 이름)
특정 부모 컨테이너 내의 개체를 고유하게 식별하는 데 사용하는 이름이다.

보안사용자
보안 사용자는 Active Directory 자원으로의 접근을 제어하기 위한 SID(보안식별자)를 할당받는 사용자를 말한다.

GUID(전역 고유 식별자)
Active Directory는 관리자가 입력하는 정보를 바탕으로 SID(보안 식별자)와 보안사용자를 식별하는 데 사용되는 GUID(전역 고유 식별자)를 만든다.
[출처] Active Directory|작성자 JYP

2012년 4월 1일 일요일

TCPDUMP 사용법

1. 패킷의 출발지가 111.111.111.111인 경우
[root@shuiky ~]# tcpdump src host 111.111.111.111

2. 패킷의 목적지가 111.111.111.111인 경우
[root@shuiky ~]# tcpdump dst host 111.111.111.111

3. 패킷의 목적지가 111.111.111.111 이고 port가 80 인 경우
[root@shuiky ~]# tcpdump dst host 111.111.111.111 and dst port  80

4. 패킷의 목적지가 111.111.111.111 또는 222.222.222.222 인 경우
[root@shuiky ~]# tcpdump dst host 111.111.111.111 or dst host 222.222.222.222

5. 패킷의 목적지 주소가 111.111.111.111  인 경우
[root@shuiky ~]# tcpdump dst net 111.111.111.111

6. 패킷의 목적지 주소가 111.111.111.111 이고 netmask가 255.255.255.0 인 경우
[root@shuiky ~]# tcpdump dst net 111.111.111.111 mask 255.255.255.0

7. 패킷의 목적지 주소가 111.111.111.111 이고 CIDR(Classless Inter-Domain Routing)이 32인 경우
[root@shuiky ~]# tcpdump dst net 111.111.111.111/32

8. 패킷의 목적지 포트가 80인 경우 (ip/tcp, ip/udp)
[root@shuiky ~]# tcpdump dst port 80

9. 패킷의 목적지 포트가 TCP 80인 경우
[root@shuiky ~]# tcpdump tcp dst port 80

10. 패킷의 크기가 50과 같거나 적은 경우
[root@shuiky ~]# tcpdump less 50

11. 패킷의 크기가 50과 같거나 큰 경우
[root@shuiky ~]# tcpdump greater 50

2012년 3월 22일 목요일

FTP 로그인은 되지만 폴더 목록이 안 나올 때(공유기에서 접속 문제)


자신이 사설 아이피(192.168.x.x)를 사용할 때 발생을 하게 되는데,
FTP 서버에서, 해당 클라이언트 컴퓨터를 찾지 못해서입니다.

익스플로러의 경우

      도구 -> 인터넷 옵션 -> 고급 -> 탐색 -> 방화벽 및 DSL 모뎀과 호환되는 수동 FTP 사용

에 체크하시면 되고~
 
일반 FTP 프로그램(알FTP, CuteFTP 같은...)에서는
     
접속 설정에서 "Passive 모드 사용"이나, "Use PASV"를 선택하시면 해결됩니다.^^


FTP 접속에는 2가지 모드가 있습니다.

1. Active Mode (기본)
2. Passive Mode

FTP 연결을 할 때, 자신의 컴퓨터와 FTP 서버 컴퓨터와 통신을 하는데 있어서,

자신의 컴퓨터의 아이피를 서버에 알려서 연결 요청을 해야하는데,
(Active Mode)

자신이 사설 아이피라면, 서버에서 컴퓨터를 찾지를 못하게 됩니다.

이럴때, 사용하는 것이 Passive Mode입니다. 연결 요청을 서버에서 알아서 하는겁니다.


FTP 장애 ( Active FTP , Passive FTP)

ftp 서버를 셑팅하여 쓸때 접속하여서 특정폴더에 접속이 잘안되는 문제가 생길시에
아래와 같은 환경을 고려해볼수있습니다.

FTP 서버가 사용하는 포트는 2개 입니다.
하나는 로그인과 디렉토리 검색을 하기위해 사용되는 정보포트와 실제적으로 데이터를
업다운로드하는데 쓰이는 데이터 포트입니다.

FTP 서비스는 패시브모드(Passice-mode)와 액티브모드(Active-mode) 2가지를 지원합니다.

Active-mode 는 클라이언트 기반 접속으로 클라이언트에 선점되지 않은(1024이상)의
포트에서 웹서버쪽에 21번 포트로 FTP를 접속합니다.
클라이언트에서 서버쪽으로 port 명령어를 보내는 것으로 랜덤포트를 이용하여 서버 포트로
접속하는 것으로 서버포트는 항상 21번 포트로 접속됩니다.

따라서 Active 모드 접속시에 문제점이 발생되는 경우는 대부분이 클라이언트측에 있습니다.
FTP 클라이언트는 서버의 데이터포트로 실제 연결을 생성하지 않고 단지 서버에게
자신이 리스닝하는 포트를 이야기하고 서버 클라이언트가 이야기한 포트로 연결을 맺습니다.

만일 자신이 공유기나 마스커레이드를 통해 FTP 서버로 접속을 시도하게 될때 접속이 안되는 경우에
대부분은 서버로의 접속후에 클라이언트쪽으로 접속을 요청할때 사설아이피를 못찾아서
실패하는 경우입니다.

이는 서버에 Passive 모드접속을 허용하지 않게끔 설정해두어서 생기게되는 경우로
서버설정에 변경없이 꼭접속을 하기를 원한다면 공유기를 떼고 다이렉트로 접속해 보면됩니다.

이에 공유기나 마스터레이드 같은 사설사용자들을 위해 생겨난 방식이 Passive 모드입니다.

Passive-mode 는 서버쪽 21번 포트로 접속시, 클라이언트의 랜덤 포트가 아니라 서버쪽 랜덤포트를
이용하게됩니다.
서버는 클라이언트에게 pasv 명령어를 보내며, 클라이언트는 승인하게 됩니다.
문제는, 패시브모드의 경우 서버쪽에 1024 에서 65535 포트 사이를 랜덤하게 할당하며,
네트워크 세션이 있을때 마다 신규포트를 이용하게 됩니다.

이때, 서버쪽에 방화벽을 운영하거나 대량접속서비스가 운영중일때는 네트워크 자원이 부족하게 되어
접속장애가 있을수 있습니다.

즉 사용자가 공유기를 사용하거나 하는 환경에서는 Passive 모드를 사용하게 되는데
서버에 방화벽등이 설정되어있으면 해당포트가 방화벽에의해 차단되므로 접속이 잘안되거나
특별히 파일갯수가 많은 폴더를 선택시 연결이 끉어질수있습니다.

해결방법은 경우에 따라 달라지는데 (간단한것부터)
1.사용자가 공유기등을 사용한다면 Passive 모드로 연결해볼것
2.사용자가 공유기등을 사용하지 않는데 서버에 접속이 잘안될경우에는 Active 모드로 연결해볼것
3.위에 경우에도 잘안되면 사용자가 공유기들을 사용하는데 서버에서는 방화벽을 사용할경우
서버에서 Passive 모드를 사용할수있게 아래와 같이 셑팅을 해볼것

Passive-Mode를 사용하기 위한 포트 고정방법
 
1) Window 시스템
 
Windows 2000 Server 및 Windows Server 2003 모두  PassivePortRange 값을 이용하여 조정이 가능하다.
Windows Server 2003 의 경우는 메타베이스를 수정
1. 인터넷 정보 서비스 관리] - [로컬 컴퓨터] - [속성 ] - [메타베이스 직접 편집 허용]에 체크
 
2. C:\WINDOWS\system32\inetsrv 밑에 metabase.xml 을 메모장으로 연다.
 
3. 고정해야될 패시브 데이타 포트항목을 아래 라인과 같이 추가한다.
PassivePortRange="5001-5001"
..................................................................................
..................................................................................
..................................................................................
<IIsFtpService Location ="/LM/MSFTPSVC"
  AdminACL="XXXXXXXX"
  AllowAnonymous="TRUE"
  AnonymousOnly="FALSE"
  AnonymousUserName="IUSR_SERVER-X62W0LSZ"
  AnonymousUserPass="XXXXXXXXX"
  ConnectionTimeout="120"
  DownlevelAdminInstance="1"
  ExitMessage=" "
  LogAnonymous="FALSE"
  LogExtFileFlags="XXXXXXXXX"
  LogFileDirectory="C:\WINDOWS\system32\LogFiles"
  LogFilePeriod="1"
  LogFileTruncateSize="20971520"
  LogNonAnonymous="FALSE"
  LogOdbcDataSource="TSLOG"
  LogOdbcPassword="XXXXXXXXXX"
  LogOdbcTableName="FTPLog"
  LogOdbcUserName="InternetAdmin"
  LogPluginClsid="{FF160663-DE82-11CF-BC0A-00AA006111E0}"
  LogType="1"
  MSDOSDirOutput="TRUE"
  MaxClientsMessage=" "
  MaxConnections="100000"
  PassivePortRange="5001-5001" >
</IIsFtpService>
..................................................................................
..................................................................................
..................................................................................

4. 편집한 metabase.xml 파일을 저장한다
 
5. IIS 를 다시한번 재시작한다.
 
6. Ipsec 이나 방화벽이 설정되어있다면 tcp 5001을 추가한다.
 

Windows 2000 Server 의 경우는 레지스트리 값을 추가
HKEY_LOCAL_MACHINE\System\CurrentControlSet\Services\Msftpsvc\Parameters\
에서 REG_SZ 타입의 PassivePortRange 값이름을 추가한다.
값으로는, 5500-5700 을 설정한다.


2) Linux 시스템
 
먼저 패시브 모드를 사용하기 위해서는 서버에 ip_conntrack 모듈이 있어야 한다.
ip_conntrack 은 연결추적 모듈이다. 몇번 IP 가 몇번 포트를 통해서 접속했는지에 대한 정보가 담겨있다.
정보가 담겨있는 위치는 /proc/net/ip_conntrack 이다.
[root@smileserv ~]# cat /proc/net/ip_conntrack
........................................................................................................................
........................................................................................................................
........................................................................................................................
udp      17 27 src=219.78.47.179 dst=111.111.111.241 sport=7957dport=8630 packets=1 bytes=90 src=111.111.111.241 dst=219.78.47.179sport=8630 dport=7957 packets=1 bytes=81 mark=0 use=1
udp      17 7src=58.172.208.159 dst=111.111.111.241 sport=55210 dport=8630 packets=2bytes=306 src=111.111.111.241 dst=58.172.208.159 sport=8630 dport=55210packets=2 bytes=411 [ASSURED] mark=0 use=1
udp      17 114src=111.111.111.1111 dst=222.222.222.22 sport=33181 dport=161packets=34 bytes=2692 src=222.222.222.22 dst=111.111.111.236 sport=161dport=33181 packets=34 bytes=2875 [ASSURED] mark=0 use=1


패시브 모드를 사용하기 위한 vsftp.conf 설정
[root@smileserv ~]# vi /etc/vsftpd/vsftpd.conf
# You may specify an explicit list of local users to chroot() to their home
# directory. If chroot_local_user is YES, then this list becomes a list of
........................................................................................................................
........................................................................................................................
## 데이터 전송을 위해서 Passive mode를 사용할 것인지 설정 (기본값 = YES)
## => Active Mode로 접근할 수 없는 사용자들을 위해 활성화
pasv_enable=YES
 
## 패시브 모드로 연결시 할당될 최대 및 최소 포트를 설정 (기본값 = 0)
## => 일반적으로 50000~60000 포트를 지정 (기본값 = 0)
## 기본값인 0은  well-known port를 제외한 무작위 포트를 이용하게 됩니다.
pasv_min_port=50000
pasv_max_port=50001
.......................................................................................................................
........................................................................................................................
패시브 모드를 사용하기 위한 proftpd.conf
[root@smileserv ~]# vi /etc/proftpdproftpd.conf
# You may specify an explicit list of local users to chroot() to their home
# directory. If chroot_local_user is YES, then this list becomes a list of
........................................................................................................................
........................................................................................................................
AllowForeignAddress on
# 30000 ~ 32000 Port 를 사용해서 패시브 포트 지정
PassivePorts 50000 50001  
.......................................................................................................................
........................................................................................................................
실제로 바뀐부분이 적용되는지를 확인해 본다.
[root@smileserv ~]# netstat -atnp |grep vsftpd   ==> FTP 접속전
tcp        0      0 0.0.0.0:21                  0.0.0.0:*                   LISTEN      21363/vsftpd 

 
[root@smileserv ~]# netstat -atnp |grep vsftpd   ==> FTP 접속중
tcp        0      0 0.0.0.0:21                  0.0.0.0:*                   LISTEN      21363/vsftpd  
tcp        0      0 192.168.0.222:21          192.168.0.4:3621           ESTABLISHED 21374/vsftpd  
tcp        0      0 192.168.0.222:21          192.168.0.4:3622           ESTABLISHED 21377/vsftpd  
 
 
[root@smileserv ~]# netstat -atnp |grep vsftpd  ==> PASV 고정전 데이타 전송중
tcp        0      0 218.236.115.222:34795       0.0.0.0:*                   LISTEN      21427/vsftpd  
tcp        0      0 0.0.0.0:21                  0.0.0.0:*                   LISTEN      21414/vsftpd  
tcp        0      0 192.168.0.222:21          192.168.0.4:1090           ESTABLISHED 21422/vsftpd  
tcp        0      0 192.168.0.222:21          192.168.0.4:1091           ESTABLISHED 21425/vsftpd  
tcp        0  87765 192.168.0.222:34795       192.168.0.4:1106           ESTABLISHED 21427/vsftpd 
 

[root@smileserv ~]# netstat -atnp |grep vsftpd  ==> PASV 고정후 데이타 전송중
tcp        0      0 218.236.115.222:50001        0.0.0.0:*                   LISTEN      21379/vsftpd  
tcp        0      0 0.0.0.0:21                  0.0.0.0:*                   LISTEN      21363/vsftpd  
tcp        0 116800 192.168.0.222:50001        192.168.0.4:3666           ESTABLISHED 21379/vsftpd  
tcp        0      0 192.168.0.222:21          192.168.0.4:3621           ESTABLISHED 21374/vsftpd  
tcp        0      0 192.168.0.222:21          192.168.0.4:3622           ESTABLISHED 21377/vsftpd  

설정된 정보가 잘 반영되는것이 확인된다.
 
주의 ) 익스플로러를 통해서 FTP 접속은 패시브 모드방식이다.
 
위와같이 해도 안되었습니다. 원인 파악은 되었는데 안되어서 좀 더 찾아 보니 답이 나오네요. 이 놈 때문에 또 2시간을 썼습니다. 다음과 같이 하면 됩니다.다음은 www.iptime.co.kr 에 있는 내용입니다. 그러니까 iptime 공유기일때 적용됩니다. 서버가 설치된 공유기에서 설정을 해야죠. 기타기능설정을 해 주었더니 패시브 모드로 접속하면 폴더가 잘 뜨네요.
   FTP 21 포트에 제한이 있는 경우 설정하기
외부에서 내부로 접속할 시에 사용하는 인터넷 회선에서 FTP 21번 포트의 제한이 있는 경우
외부 사용 포트를 변경하여 서버를 운영할 수 있습니다.
이때 21번 대신 다른 포트를 설정하시게 되면 추가로 FTP 비정규 포트를 설정하여야 합니다.
 
1. [ipTIME] 웹 설정 화면에 로그인 후 [고급 설정] [NAT/라우터 설정] [포트 포워드 설정] 을 마우스로 클릭합니다.
 
2. [정의된 리스트] FTP체크 후, 서버로 사용할 PC IP 주소와 외부 포트를 입력하고 적용을 클릭합니다.
(:2121)
 
 
[ 그림 3 ]
 
3. FTP 포트 설정 후 [고급 설정] [NAT/라우터 설정] [기타 기능 설정] 을 마우스로 클릭합니다.
 
4. [기타 기능 설정] 에서 FTP 비정규포트 설정에서 외부 포트를 입력 후, 추가를 클릭합니다.
(포트 포워드 설정 설정의 외부 포트번호 추가)
[ 그림 4 ]
 
5. 추가하시면 아래 그림과 같이 2121번 포트가 추가됩니다.
[ 그림 5 ]
 
6. 확인 후 우측 상단의 버튼을 클릭하여 설정한 내용을 저장합니다.

네트워크 공유폴더 암호 초기화는 방법

시작 => 실행에 rundll32.exe keymgr.dll KRShowKeyMgr 

윈도우 7 sp 원격 다중접속

※주의 이것은 윈도우 7 Ultimate 에서만 동작합니다.


다음의 압축파일을 다운받고 압축을 풉니다.


 install.cmd를 관리자 권한으로 실행합니다.

약간의 시간을 기다리면


이렇게 Done이 뜨고 Press any key to continue . . . 이 나오는데 아무키나 누르면 끝납니다.